Explore practical guides and tools for Microsoft 365, Azure, and PowerShell. Enhance your cloud security and admin skills with expert insights and automation tips.
Explore practical guides and tools for Microsoft 365, Azure, and PowerShell. Enhance your cloud security and admin skills with expert insights and automation tips.
Azure File Sync : File Storage and Synchronization in Hybrid Environments
Managing file storage across on-premises and cloud environments can be challenging, especially for organizations with distributed teams. Azure File Sync is a powerful solution that enables IT administrators to centralize file storage in Azure Files while maintaining performance and local access on Windows file servers.
In this guide, we will explore how Azure File Sync works, its key benefits, and step-by-step instructions for deployment and management.
II – Understanding Azure File Sync :
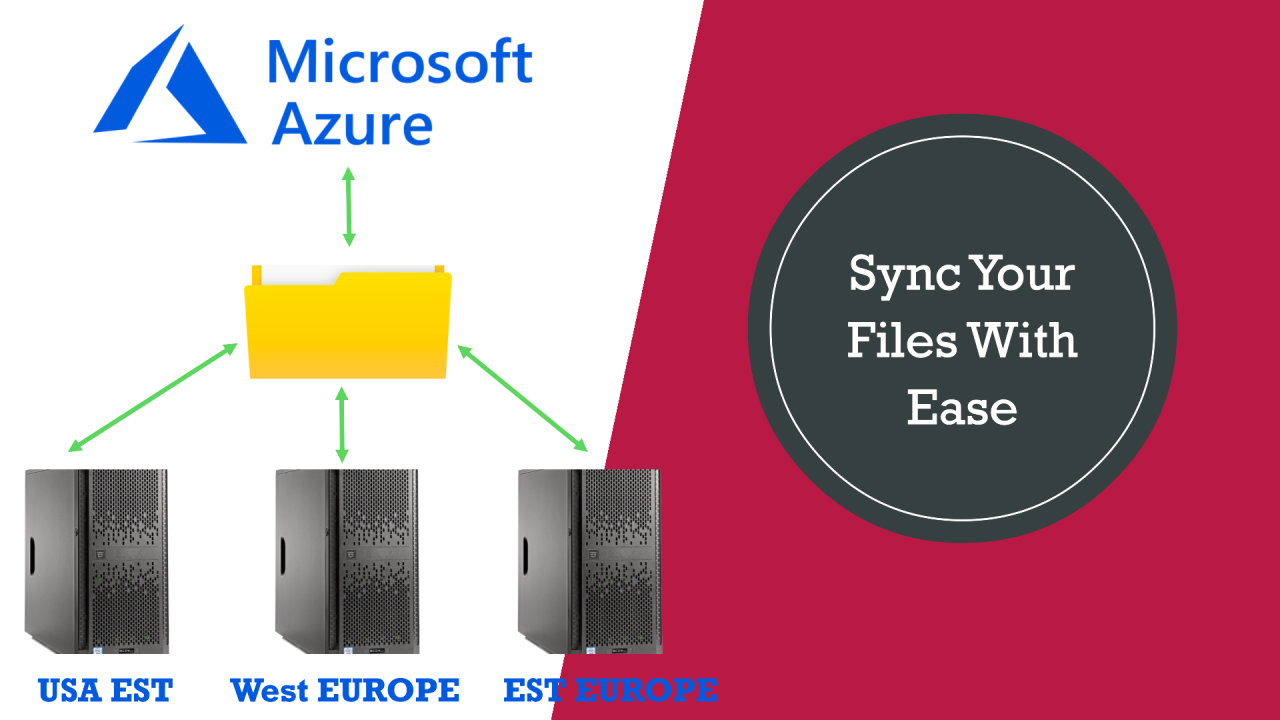
If your organization operates multiple offices worldwide and requires seamless file sharing, Azure File Sync offers an excellent solution. By deploying a local file server at each office and integrating them into a sync deployment group, you can ensure efficient file distribution.
Any modifications made at one office will be automatically synchronized across all other offices, maintaining consistent and up-to-date files everywhere.
Integration with Windows Server : Supports NTFS permissions and Active Directory authentication.
III – Azure File Sync Architecture :
in this article I’m gonna try to realise this documentation as the following diagram :
IV – Mindmap :
V – Remember :
Azure Storage Account must be Géo-Redandant for best availibility.
Azure File Sync service should be in the same location as Azure storage Account.
Any files deleted locally will also be deleted in the cloud, because Azure File Sync is sync solution and not a backup solution.
VI – Step-by-Step Deployment Guide :
1 – Prepare Azure File Share Folders :
Go to the Azure Portal
Navigate to First Storage Accounts > File Shares
Click + File Share and follow steps.
2 – Create a Azure File Sync Service:
Go to Azure Portal and search for Azure File Sync
Click + Create and configure resource group, region, and name
Click “Review + Create“.
Click Create
3 – Create Sync Group for every Azure File Share :
A Sync Group in Azure File Sync is an object that defines the synchronization relationship between a cloud endpoint (such as an Azure file share) and a server endpoint (such as a folder on a Windows server). Endpoints within the same Sync Group are kept synchronized with each other.
This allows you to centralize your organization’s file shares in Azure Files while retaining the flexibility, performance and compatibility of a local file server.
Let’s get started :
Open “Sync” menu then “Sync Group“
Click “+ Create a sync group“
Here we will create 3 Sync groups for every server :
Give a name to your sync group
Select Subscription, storage account and file share
Click “Create“
4 – Install and Configure Azure File Sync Agent in every server :
Install the Agent:
To set up the local server, we need to install the Azure File Sync Agent. This agent will link to the Azure Storage Service, ensuring all files remain synchronized. Before proceeding, it’s essential to disable Internet Explorer Enhanced Security Configuration on the server.
Open the server manager and select Local Server
Click on the link labeled On behind the IE Enhanced Security Configuration
Select Off for both Administrators and Users
Download Azure File Sync Agent from Microsoft : Link
Install on your Windows file server (Next Next)
Register the Servers :
Open Azure File Sync Agent
Sign in with Azure credentials and register the server
Select Settings for Azure file sync agent (Subscription, RG and storage account) the click “Register“
You should see this windows with “Registration successful” message
Now comeback to your sync group :
Click “Add Server Endpoint” then select registred server and Shared folder path.
Click “Create“
Here after adding US server + Europe Server :
here is my shared folder in Canada server, lets wait couple of minutes and check if those files have been synched in Azure file share folder.
As you can see here files has been synched successfully in azure File share folder :
also same files has been replicated to other servers.
Any file added in any server will be replicated in all servers.
VII – Enable Cloud Tiering (Optional)
Cloud Tiering in Azure File Sync is an optional feature that helps manage local storage efficiently while maintaining the performance of an on-premises file server. When enabled, Cloud Tiering stores only frequently accessed (hot) files on your local server, while infrequently accessed (cool) files are stored in an Azure file share in the cloud.
Here’s how it works:
Hot files : Frequently accessed files are kept on the local server for quick access.
Cool files : Infrequently accessed files are moved to the cloud, with only their metadata (file and folder structure) stored locally. When a user accesses a cool file, Azure File Sync recalls the file data from the cloud seamlessly.
Cloud Tiering uses two main policies to manage file storage:
Volume Free Space Policy : Ensures a specified percentage of the local disk remains free by tiering cool files to the cloud when the local disk space is low.
Date Policy : Tiers files to the cloud if they haven’t been accessed for a specified number of days.
This feature helps reduce the amount of local storage required while still providing the benefits of a local file server.
VIII – Best Practices for Azure File Sync :
Use Cloud Tiering Wisely : Optimize local storage by configuring appropriate tiering policies.
Backup Your Data : Enable Azure Backup to protect cloud-based files
Monitor Sync Performance : Regularly review logs and alerts for sync errors.
Optimize Network Bandwidth : Schedule large sync operations during off-peak hours.
Secure File Access : Use RBAC and NTFS permissions to control access.
IX – Common Issues and Troubleshooting :
A – Sync Delays or Failures
Check Connectivity : Ensure the file server can reach Azure.
Verify Storage Quotas : Ensure enough space is available in Azure Files.
Check Permissions : Confirm that the Sync Agent has correct access permissions.
B – Cloud Tiering Issues
Files Not Moving to Azure : Adjust tiering policies or reduce cache percentage.
Files Unavailable Locally : Increase cache size to store more frequently accessed files.
X – Conclusion :
Azure File Sync is a game-changer for organizations looking to modernize file storage while maintaining on-premises access. By leveraging synchronization, cloud tiering, and backup integration, IT teams can ensure high availability, scalability, and cost efficiency.
By following this guide, you can successfully deploy Azure File Sync, optimize storage performance, and future-proof your file infrastructure.
Thanks
Aymen EL JAZIRI (Microsoft MVP)
Hi, I’m Aymen El Jaziri , a passionate System Administrator and Microsoft MVP, with years of hands-on experience in managing and securing modern IT infrastructures.
This blog is where I share technical guides, automation scripts, product reviews, and real-world solutions that help IT professionals simplify their day-to-day work and stay ahead in a fast-evolving cloud ecosystem.
Whether you’re here to troubleshoot an issue, improve your automation game, or learn new best practices , welcome in my blog !
Let’s build a stronger, smarter IT community together.
Feel free to connect with me on LinkedIn for more content, discussions, or collaboration opportunities.