Physical Address
304 North Cardinal St.
Dorchester Center, MA 02124
Physical Address
304 North Cardinal St.
Dorchester Center, MA 02124

Explore practical guides and tools for Microsoft 365, Azure, and PowerShell. Enhance your cloud security and admin skills with expert insights and automation tips.
Explore practical guides and tools for Microsoft 365, Azure, and PowerShell. Enhance your cloud security and admin skills with expert insights and automation tips.

Digital transformation has been around for a few years, but with the global pandemic, it quickly became an urgent reality for many organizations. With various closures around the world during the COVID-19 pandemic, companies suddenly had to adjust their business processes and allow workers to work from home while others were in the office. IT professionals need to ensure that printing remains secure when supporting a hybrid workforce.
The market shift to the cloud accelerated rapidly during the COVID-19 pandemic, and Microsoft believes Universal Print will play a key role in the new normal.
Microsoft 365 brings together Office, Enterprise Mobility + Security and Windows 10 Enterprise to offer users the most innovative productivity tools. Universal Print is an innovative new technology that offers a flexible printing environment using a cloud-based service that is part of Microsoft 365.
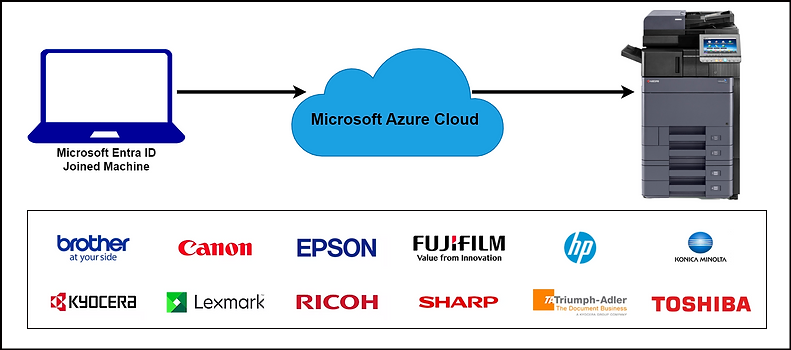
Universal Print is a new cloud-based printing solution from Microsoft that makes it easy to print from devices connected to Microsoft Entra Id without the need to travel to the office to print, nor the need for a VPN connection (Wherever you are in the world, print without fear with Azure Universal Print). This functionality has become increasingly necessary with remote working. All Windows Server print management features will be transferred to the cloud for easy, secure and modern management.
the technician who will perform the configuration must have the role: Printer Administrator or Global Administrator.
One “Universal Print” license is assigned per user (costs $5 per month) or it can be included in the following licenses:

There are two architectures proposed by Microsoft Universal Print, as follows:

In this blog, I’ll be using the Universal Print Ready configuration.
You can check the other configuration way using connector from this link :
Configuring Azure Universal Print: using a Universal Print Connector | LinkedIn
Before starting this section, we need to answer the following questions :
You can check whether your printer is Universal Print Ready on the official Microsoft website:
https://learn.microsoft.com/fr-ca/universal-print/fundamentals/universal-print-partner-integrations
The answer is no, UPR (Universal Print Ready) printers work in serverless mode.
Let’s start with configuration. In this blog, I’ll be configuring a Kyocera printer :

Give the printer a name in the “General” section
Click on the “Register” button in the “Universal Print” section to register the printer on Microsoft Azure.

Copy the code and click on the URL :

Enter the code already copied and click Next to authenticate (I won’t print out the authentication part for security reasons).

After successful authentication with a “Global Admin” or “Print Admisitrator” account :

Returning to our printer administration interface, we’ll see a message indicating that printer registration has been successfully completed:

Now we’ll check our printer on Microsoft Azure to complete the rest of the configuration.
In the Microsoft Azure search bar, type “Universal Print”:

By selecting the “Printers” option, our printer appears in the list of printers:

First select the printer you wish to share, then click the “Share” button (as you can see, the printer status is “Not Shared” ) :

Après avoir cliqué sur le bouton “Share”, une fenêtre apparaitra pour choisir les options de partage (le nom de l’imprimante, les utilisateurs qui vont l’utilisé…etc ).
Cliquez sur le bouton “Share Printer“

To be sure that the printer is shared, its status must be in “Ready” mode, as shown in the image below :

Once the above steps have been completed, what do remote users need to do to be able to search for cloud printers from within Windows 10?
Open Settings from the Start menu and go to printers and scanners and click add printer or scanner.

At the end of the search, the remote user will be able to see all the cloud printers to which the administrator has granted access.

Thank you